Electronic Arts is shutting down renowned Canadian studio BioWare, Bloomberg reported Wednesday. Four hundred jobs will be cut, which is around 3% of Electronic Arts' staff; fifty of those jobs were from BioWare alone, per the report. BioWare was reportedly working on the next Mass Effect game, which has been canceled, Bloomberg reported, citing an interal memo to staff from Electronic Arts chief operating officer David Tinson and chief studios officer Cam Weber.
BioWare confirmed the studio closure in a post on X shortly after Bloomberg's report was published.
"Now, after more than three decades of shared adventures, BioWare is closing and early development on the next Mass Effect project is ending," BioWare wrote in the post. "There is nothing easy about writing those words. Our focus riht now is on our incredibly talented team who put their hearts into these games, and supporting one another through this transition."
Electronic Arts is also canceling a The Sims game called Project Lotus, instead pivoting toward another game currently called Project Evergreen. Electronic Arts will focus on its sports games, Apex Legends, and its licensed IP projects like Iron Man and the next iteration of Star Wars Jedi. Bloomberg reported that Electronic Arts will also pursue the Battlefield franchise, and that Respawn and DICE are working on a new project, "which is likely to be another entry in the Star Wars: Battlefront series."
Electronic Arts was taken private in August in a $55 billion buyout; the Saudi Arabian government's investment fund led that purchase. The deal left $18 billion in debt on the company's books. Electronic Arts told its investors earlier this year it would cut costs, saving up to $700 million, per Bloomberg, by slashing its research and development budget.
BioWare was once one of the industry's most iconic studios, known for the Mass Effect and Dragon Age series, as well as Star Wars: Knights of the Old Republic and Baldur's Gate. It was founded more than three decades ago, in 1995, by Ray Muzyka, Greg Zeschuk, and Augustine Yip. The company was acquired by Electronic Arts, along with Pandemic Studios, in 2007 for $775 million. BioWare has struggled in recent years to match the success of its earlier games. Anthem, its multiplayer shooter released in 2019, failed to meet expectations and was ultimately shut down in 2025. Dragon Age: Veilguard, released in 2024, similarly struggled to meet Electronic Arts' expectations. It was after that game's release where Electronic Arts started to pull apart BioWare, shuffling employees to other studios and laying off others. By 2025, fewer than 100 employees remained at the company.
Electronic Arts' big, public struggles were confirmed in 2023 when Electronic Arts began rapidly cancelling projects and closing studios. Apex Legends Mobile and Battlefield Mobile were canceled, and developer Industrial Toys was shuttered. Hundreds of quality assurance testers were laid off that year, too, shortly before Electronic Arts announced a massive 6% layoff, cutting 775 employees. Fifty BioWare employees were laid off in 2023, too; they ended up suing the company for better severance pay. The results of that lawsuit have not been made public. Layoffs and cancellations continued from there: in February 2024, Electronic Arts laid off 5% of its workers, or roughly 670 people. An early in development Star Wars game was canceled at that time. In 2025, Electronic Arts laid off several hundred people, canceled Cliffhanger Games' Black Panther, and closed the studio. Though Electronic Arts laid off hundreds of people, in March 2025, the studio was up 800 more people than the same time the prior year. The studio has roughly 14,000 employees currently.
The grim reality is that this is not an uncommon course of action in the video game industry. An absurd amount of people are still being laid off each year. Just this year, Microsoft laid of 1,600 people and is expected to cut 1,600 more. The layoffs span companies big and small: Sony Interactive Entertainment, PowerWash Simulator's FuturLab, and Ubisoft are among others who've laid off staff, while Netflix shuttered Oxenfree maker Night School Games.
1980s EA was something special but nothing after the 8bit era hit me the way some of those games did on my commodore. Some of it was me growing up, sure. But not all
While BioWare's recent games didn't capture me like their earlier works (often due to management interference) it's just sad to see such a great studio die.
I tested 25 of the most popular package managers to check whether they detect a compromised package repository injecting malicious code into legitimate packages. This code integrity problem could be solved using cryptographic hashes or signatures, but many package managers are still vulnerable to this threat. Of the 25 package managers reviewed1, fewer than half used lockfiles that checked for tampering by default, and only two verified the integrity of every package they downloaded.
Supply-chain attacks caused by developer compromise are a common story, but imagine what happens if ongoing mitigation attempts, including work by Trail of Bits2, are successful. If developers of popular packages are no longer the easiest targets, attackers will shift their focus to the next weakest link in the system: the package repositories that serve the code. The cryptographic answers to this problem are more subtle than they appear, and many implementations fall short due to deliberate design choices, resource prioritization, or the complexity of developer-friendly solutions.
One natural answer is to include a cryptographic hash of a package’s contents in a lockfile and compare hashes after downloading the package. This automatic verification was the default behavior in about half of the package managers I tested, but others required extra configuration to include or verify these hashes, used hashes in a cryptographically insecure way, or lacked hashes entirely. This is summarized in the following table.
CocoaPods, Composer, Conan, cpanminus, Gem, Maven, PowerShellGet, PSResourceGet, R
Table 1: Lockfile-based security of a package manager fetching dependencies from a malicious repository, categorized by how much work it takes a developer to achieve integrity. Experimentally verified for a particular configuration. Caveats detailed below.
Another natural approach is to use signatures, avoiding the need to securely distribute a hash for every package. However, in my tests, only Go verified signatures by default; others required extra configuration, lacked verification code, or did not support signatures.
Table 2: Signature-based security of various package managers. Also experimentally verified and subject to similar caveats.
As both tables show, I found a surprising variation in the cryptographic designs and the level of protection they provide. Despite the challenges, I also found several communities on the frontier of this integrity problem that are bringing improved designs to reality. This post explores those variations, showing where certain designs fall short, why code integrity is harder to solve than it appears, and what cryptographic designs might be adopted in the future.
Simulating malicious package repositories
Studying the cryptographic behavior of 25 package managers is quite the challenge. I wanted to minimize manual analysis, but also be 100% confident when I claim an attack from a malicious package repository is possible. To solve this problem, I built a testing harness based on Docker containers and mitmproxy that dynamically evaluates the security of package managers against a malicious server.
Figure 1: Experimental design of the test harness used to simulate malicious package repositories
The Ubuntu-based Docker images include a package manager, sample code, and optionally a lockfile. There are conflicting opinions about whether to include lockfiles in source code repositories, so I tested both configurations. The harness instructs the package manager to fetch dependencies from the repository, and the resulting network request routes through a WireGuard network to a custom mitmproxy addon.
Because the mitmproxy TLS CA is installed in the Docker image, the addon can fully manipulate the plaintext from the package repository, simulating a compromised server. I assumed any web-facing server could be compromised (e.g., Composer fetches metadata from Packagist and packages from GitHub), but backend resources, like any private signing keys, remain secure. The simulated repository embeds malicious code into the downloaded packages, and if the sample code executes the malware, the attack is successful.
I tried to keep the experimental setup reflective of real-world usage, but there are limitations. I installed the latest package manager versions, followed quickstart guides for setting up sample projects inside the container, and picked popular packages from public repositories to infect. I ran package manager commands with default flags to see if extra steps, like modifying the project manifest or running extra commands, were needed to enforce cryptographic integrity. However, I am limited to testing a single package with a single package manager version on a single platform, and the test conditions (e.g., PowerShell and CocoaPods on Ubuntu) may not represent the most common usage patterns. The setup isn’t meant to show that every developer is vulnerable to a malicious package repository, just that a developer following reasonable conventions is.
With the package managers installed and network intercept functional, one (mostly) promising observation is clear.
HTTPS is (almost) everywhere
Our harness architecture captures all network traffic, so it’s easy to test that package managers are using TLS and validating the certificates. In almost every package manager, they are.
The exception is cpanminus, the frequentlyrecommended package manager for Perl. cpanminus uses unencrypted HTTP by default to connect to the Perl package repository, allowing any active network attacker to inject malicious code into downloaded packages. This vulnerability has been known for years, but the cpanminus developer has not switched to HTTPS, since doing so would be a breaking change to default behavior.3
Hash functions don’t always provide integrity
By using the mitmproxy addon to modify the package repository responses, I could investigate how different package managers use cryptographic hashes. Hashes are a natural way to ensure that a downloaded file has not been tampered with, but the main question is how the package manager learns the correct hash in the first place.
Microsoft’s vcpkg package manager for C and C++ libraries offers an interesting example. The package manager source code includes content hashes for thousands of dependencies. When a developer updates their library and wants to register the new content in vcpkg, they recompute the hash of their package and open a pull request against the vcpkg source code with the new hash and link to the package. When a package is downloaded by vcpkg, the hash is checked. So as long as the package manager is trusted, this approach is fully secure against a malicious package repository.4
Hashes in lockfiles
It is significantly more common that the package manager learns the correct hash via a lockfile. A lockfile is frequently created by a package manager, resides alongside a project’s source code, and references specific versions of dependencies needed by the project. If a developer checks a lockfile with cryptographic hashes into the source code repository, and the user’s package manager validates downloaded packages against the hashes, then the user’s dependencies perfectly match the developer’s.
This is how it works for the Bun package manager for JavaScript projects. Installing a package with bun addupdates the bun.lock lockfile; committing the lockfile to Git and calling bun install on another copy of the repo verifies the hash in the lockfile against the new copy of the dependency. Similar behavior is found in npm, pnpm, and Yarn (also JavaScript package managers); uv and Poetry (Python package managers); Bundler (for Ruby); Cargo (for Rust); and SwiftPM (for Swift).
Other package managers support lockfiles, but with more steps than the standard add/restore process. Python’s Pip has experimental support for the pylock.toml format, and Conda has the optional library Conda lock. NuGet, the .NET package manager, generates a lockfile after adding the RestorePackagesWithLockFile property to the project.
Many package managers (Maven, R, PowerShellGet, PSResourceGet, and cpanminus) do not have dedicated lockfiles, and some have lockfiles (Gradle’s gradle.lockfile5 and Gem’s Gemfile.lock) without hashes in them.
Hashes present, but not for integrity
Surprisingly, I found a few examples where the lockfiles had a hash, but could still be compromised by a malicious server. This is not necessarily reflective of a vulnerability, since the underlying behavior is clearly documented, but it shows how there are multiple valid opinions about how lockfiles should be structured and consumed. Nevertheless, a user who is accustomed to the behavior of one package manager may be surprised by that of another.
The first example is the Pub package manager for Dart and Flutter. The following excerpt of a pubspec.lock file includes a SHA-256 hash for the uuid package.
If a user calls flutter pub get to fetch dependencies, Pub downloads the package from the pub.dev server and computes the hash of the returned binary. If there is a mismatch, Pub detects the error, but installs the package anyway.
The existing content-hash from pubspec.lock doesn't match contents for:
 * uuid-4.6.0 from "https://pub.dev"

This indicates one of:
 * The content has changed on the server since you created the pubspec.lock.
 * The pubspec.lock has been corrupted.

The content-hashes in pubspec.lock has been updated.
This is documented behavior, and requires the non-default --enforce-lockfile option to block installation6.
Overwriting the lockfile after a hash mismatch was also the default behavior in pnpm until version 11.4 from May 2026, when it was changed to close “supply-chain holes.” Like Pub, pnpm also supported a non-default --frozen-lockfile flag, indicating that the previous behavior which updated the lockfile was expected.
Next, here is an excerpt of a conan.lock file, used by the Conan package manager for C and C++.
This includes the package name (zlib), the version number (1.3.1), a recipe revision cac0f6daea041b0ccf42934163defb20, and a timestamp. The 128-bit revision is an MD5 hash that includes source code. However, this hash is not intended to provide cryptographic security, but rather serves as a unique identifier. When Conan installs dependencies using this lockfile, it uses the recipe revision hash to download a particular file from the ConanCenter repository, but it does not recompute the recipe hash. Even if it did, there’s a separate package revision hash for platform-specific binaries that is not in the lockfile, and MD5 collisions could allow an attacker to create two distinct recipes with different behavior but the same hash.
The CocoaPods dependency manager for Swift and Objective-C has a similar pattern. Here is part of a Podfile.lock file for a project that uses the popular Files dependency.
This 160-bit checksum is the SHA-1 hash of the Files Podspec, which contains the following link to the source code. CocoaPods uses this link to fetch the Git repository.
So even though the lockfile can prevent tampering with the GitHub URL in the Podspec (setting aside expensive SHA-1 collision attacks), a compromised GitHub server could just serve a malicious version of the repository with the same tag.
Finally, the Composer dependency manager for PHP includes commit hashes in the composer.lock file, as in the following excerpt.
However, even though the b094ded... commit hash uniquely identifies the code, the ZIP archive in the URL does not include the Git tree as a way to verify the hash. Once again, GitHub could serve a malicious ZIP archive without detection by Composer.
Lockfiles have many roles besides supply-chain integrity
The previous experimental results show that lockfile hashes often can be used to enforce package integrity, but this is not their sole or even original purpose. Alternatively, they can lock dependencies to a particular functionality, enable an easy way for application developers to share a consistent environment, or facilitate reproducible builds. Analyzing package manager lockfiles through the lens of supply-chain security is a recent interpretation that can be at odds with their original design. The recent change to pnpm’s --frozen-lockfile is one example.
Another example of this tension is the question of whether the lockfile should be committed to version control. Most modern guidance recommends committing the lockfile for applications, since the final build environment is fully controlled. The question is more complicated for libraries, since package managers often ignore libraries’ lockfiles to avoid locking to conflicting transitive dependencies. Committing the lockfile makes it easier to develop the library by sharing a consistent build environment with other developers, but excluding the lockfile makes it easier to catch conflicts with different dependency versions before they are found by users. Many package managers recommend committing the lockfile for libraries (e.g., npm, pnpm, Poetry, uv, and Yarn), some recommend excluding it (e.g., Bundler), and some leave it up to the developer (e.g., Cargo).
Many of these questions are explored in a recent study by Gamage et al. The authors explore lockfile design decisions for seven package managers, analyze published projects, and perform semi-structured interviews with 15 developers. They find that the practice of committing a lockfile varies by which package manager is used, and categorize five benefits to using lockfiles, as perceived by the interview subjects: build determinism, integrity, transparency into indirect dependencies, debugging, and security scanning. Some of the developers also preferred to not use lockfiles, citing a preference for end users to resolve to the latest version of a dependency, which may have more bug fixes and vulnerability patches.
The diversity of package manager designs and views surrounding the purpose of lockfiles makes it difficult to prescribe a single recommendation. With regard to supply-chain integrity, it is common, but not universal, to view lockfiles as a source of integrity that should be committed with the source code. For package managers with lockfiles that do not provide cryptographic integrity, it is worth considering whether their users share that expectation. Even when lockfile hashes can provide cryptographic integrity, locking to specific package hashes means that users do not immediately receive subsequent updates or security fixes, since the newer package has a different hash. This leads to frequent lockfile bumping to distribute the latest hashes. Wanting immediate updates is a separate concern from wanting package integrity, but the current, common approach of using hashes in lockfiles is at odds with that goal. In conclusion, lockfile hashes are often, but not always, effective at providing cryptographic integrity, but do not work in every situation.
Signatures are common; verification is not
Signatures are a natural way to address these shortcomings, but implementations frequently fall short. In theory, developers could sign every release with their own private key, and the package manager could check the signature of the package it downloads from the package repository. In fact, signatures are relatively common in different package ecosystems, but proper signature validation is surprisingly lacking. The reality of using signatures to provide code integrity is more nuanced than it seems, and package managers have different approaches to the problem.
Many package managers have no signatures available. Arguably, vcpkg does not need them, because all package hashes are distributed with the manager, but this leaves Cargo, CocoaPods, Composer, Conan, Conda, Pub, R, and SwiftPM7. The Conan developers are aware and previously decided not to fix it, citing several implementation challenges and suggesting organizations where integrity is critical could run their own repository server. Cargo developers are actively considering different signing designs, but this effort is still in progress. Composer developers have been implementing many new protections against supply-chain attacks, with future plans for artifact integrity.
Repository signing
One straightforward approach, known as repository signing, is when the package repository signs every package once it’s uploaded, and the repository’s public key is distributed with the package manager. This doesn’t solve the problem of a totally compromised package repository, since a malicious package repository could legitimately sign a malicious package, but it would protect against untrusted mirrors or a partial compromise of a package repository’s serving infrastructure.
Repository signatures are used by the npm Registry, the NuGet Registry, and the PAUSE server for Perl module distribution. In the npm Registry, signatures are distributed within package metadata with repository-specific public keys. NuGet Registry repository signatures are found in .signature.p7sfiles within the distributed ZIP package, again with repository-specific public keys. The PAUSE server takes a different approach, using its GPG key to batch sign the cryptographic hashes of several packages at a time.
Developer signing
Developer signing involves the developer maintaining the private key and signing the package before uploading it to the repository for distribution. This prevents the package repository from tampering with the contents, but it also provides a way for the package repository to authenticate the uploader.
There are two common approaches for a developer asserting their public key. In the first approach, the public key is distributed out-of-band. The Maven Central repository (used by Maven and Gradle) and the RubyGems repository (used by the gem and Bundler package managers) bothsupport this type of developer signing. Maven Central uses PGP signatures, and developer keys are distributed by public keyservers. RubyGems uses self-signed certificates, and their distribution is left to the developers (e.g., rspec). The major difference is that developer signing is mandatory for Maven Central, and optional for RubyGems. Developer signing is rare for RubyGems, due to the lack of an established chain of trust, and a previous attempt to introduce a certificate authority failed.
The second approach involves a chain of trust. The NuGet Registry and PowerShell Gallery both support developer signatures. Neither makes signatures mandatory, but the PowerShell Gallery recommends it and the NuGet Registry has strict requirements if developer signing is used. In both, the developer’s key must chain to a trusted CA, and acquiring a valid code-signing certificate can cost hundreds of dollars per year. The benefit of this approach is that trusted root certificates can be preinstalled on the platform, allowing package managers to verify public keys.
One downside of developer signing is that developers are responsible for key management, and they can lose the ability to update their code if they lose access to their key.
Identity-based signing
An increasingly common middle ground is “identity-based” or “keyless” signing from Sigstore. Rather than require developers to manage long-term private keys, a developer can use Sigstore’s Fulcio CA to issue a fresh signing certificate on demand, for free. To prevent impersonation, the developer proves their identity with an OIDC token: a cryptographically signed statement from a third party like Google, Microsoft, or GitHub that attests to the email address, username, or potentially other claims about the developer’s identity. The verifier can check that the username is correct and the certificate chain links back to Sigstore Fulcio’s root certificate, proving that someone with access to that account created the signature.
Keyless signing is particularly useful because it can be integrated into a developer’s existing workflow-based deployment pipeline. This is frequently called provenance attestation or trusted publishing8. GitHub and GitLab provide OIDC tokens to Actions and CI/CD workflows that attest to the build workflow, the repository, and the commit hash. A workflow can use this token to obtain a signing certificate from Sigstore, sign the built package, and upload the signed package to the package repository. Since the signing certificate includes the commit hash and workflow details, this cryptographically links the built binary artifact to its source code.
Provenance attestation via Sigstore is supported by Python’s PyPI, the npm Registry, RubyGems repository, and Maven Central. While Sigstore attestations are not mandatory, there is already betteradoption than RubyGems’ optional support for developer-managed signing keys.
Verification code is skipped, unconfigured, or nonexistent
Unfortunately, just because these signatures exist does not mean they are being verified by package managers.
In the npm package manager, the repository signatures are not checked when running npm install. Checking the signatures requires running npm audit signatures, which uses Sigstore to validate the registry public keys and then validates the signatures of the installed packages. pnpm recently added the pnpm audit signaturescommand, but that implementation fetches the registry public keys from the potentially malicious registry rather than verifying with Sigstore, so an adversary could simply add their own key and signature. Bun and Yarn currently lack an equivalent audit signatures command.
In the NuGet package manager, the defaultsignatureValidationMode is accept, which installs invalidly signed packages. The user must set this to require and configure the list of trusted signers, such as with dotnet nuget trust source. These configurations (which include the repository public keys) can be securely distributed within a nuget.config configuration file, functioning as a lockfile that locks the trusted signers.
Ruby’s Gem and Bundler, and Java’s Maven and Gradle, which all use repositories with developer signatures, do not verify signatures by default. They require the user to manually add developer public keys (gem cert --add) or list the allowed public keys that should be trusted. In Maven, one can use the third-party pgpverify-maven-plugin with pgp-keys-map.list to specify the trusted PGP fingerprints. Gradle offers dependency verification, which works similarly.
Finally, several package managers seemingly lack any sort of verification code at all. Pip, uv, and Poetry do not currently have a way to verify identity-based attestations described in PEP740. cpanminus does not have a way to verify the integrity of the repository-signed CHECKSUMS file. It once did, but in response to a verification bypass vulnerability, this verification code was removed. Even though PowerShell is supported on non-Windows platforms, Authenticode signature verification isnot9. At one point, the PowerShell repository noted that this issue “should be fixed in a future release.”
Go package management and transparency logs
Go’s built-in package manager is the only one I tested that verifies signatures by default, and it also introduces one final concept for cryptographic package integrity. When go get or go mod download fetches a package10, it hashes the package contents and compares the hash, package name, and version against the checksum database. The contents of the database are registry-signed (analogous to PGP signatures in Perl’s PAUSE server), and the default checksum database public key is hardcoded in Go’s source code. As long as the checksum database’s private key is used honestly, this design ensures that the package name and version are enough to uniquely identify the binary contents of a package. As a result, the go.mod lockfile achieves package integrity without needing to store cryptographic hashes.11
Go’s checksum database is an example of a transparency log, or an immutable, global, tamper-resistant log of metadata. The same capability is provided by Sigstore’s Rekor and certificate transparency logs. In package managers, it cryptographically ensures that the package manager only ever installs the same binaries recorded by the transparency log. If everyone agrees on the transparency log, then everyone agrees on the package contents. This makes it more difficult for an adversary to selectively and undetectably target a victim with a malicious package. Transparency logs can still fail if there are othervulnerabilities, the log’s private key is compromised, or no one checks the transparency log for malicious behavior.
Of all the package managers I tested, Go performed the best at maintaining cryptographic integrity in the face of a compromised package repository or proxy. However, the registry-signature-like design means that much of the system’s trust is concentrated in a single private key.
A proposed cryptographic design for package managers
One potential approach that combines the ideas in this post is to include signature information in the lockfile. Rather than commit to the hash of a particular package, the lockfile could commit to a developer’s identity or public key. This reuses much of the infrastructure in place for lockfile hashes, but it separates the question of immediate updates from the question of package integrity.
With this design, the lockfile could specify a single dependency version (for build reproducibility) or a lower bound (for immediate updates), and the included identity ensures that a malicious repository or proxy cannot easily tamper with whatever package version the manager resolves to. In addition, a transparency log can protect against selective targeting, building on Sigstore’s identity-based signing and transparency log service. Sigstore avoids long-lived keys by default, but it also supports self-managed keys, KMS providers, and hardware tokens. This gives an easily adopted and secure default while still giving flexibility to developers who desire more control over their keys.
This idea is not new and not my own. Attestation identities are part of the pylock.toml Python lockfile specification, the trusted-keys in Gradle’s verification metadata, and the pgp-keys-map.list file in the pgpverify-maven-plugin for Maven. This is the direction that many package managers are already moving towards, as evidenced by the increasing adoption of Sigstore into publishing workflows, attention on supply-chain security, and bugfixes that specifically cite potential tampering by a malicious adversary. There is increasing recognition that this is a problem, and increasing appetite to fix it.
It won’t be easy. There are many subtle nuances that have to be considered and addressed, signing verification code needs to be developed and audited, and developers need to adopt the resulting design. In many of the package managers I reviewed as part of this project, I found communities of people who have been thinking about and pushing for cryptographic integrity and package signing for years. They know best what those package managers need, and they deserve the resources to make this a reality.
One of the greatest cryptographic success stories in the past decade has been the nearly universal adoption of HTTPS, driven in part by industry and community recognition of the security risks of unencrypted traffic, and the nonprofit Let’s Encrypt providing free and easy-to-use TLS certificates as a public good. Package signing is in a similar state now to where HTTPS was a decade ago: persistent adversaries are a huge concern, and cryptographic security is nearly nonexistent. Universal package signing is not here yet, but it is on the horizon. With the right attention and investment, we can make it a reality.
Acknowledgments
Thank you to William Woodruff for valuable discussions about lockfiles, identity signing, and the challenges of package manager security.
This post focuses on dependency managers for source code rather than system package managers like APT, Chocolatey, or Homebrew. The line between the two is blurred, but concentrating on one helps highlight particular usage and deployment patterns in that group. ↩︎
cpanminus is included in the default Docker container for Perl, but the container build scripts patch cpanminus to use HTTPS by default. ↩︎
A subtle distinction here is that vcpkg must be updated using git pull in order to fetch the latest package hashes, shifting the question from securely installing packages to securely updating the package manager. For consistency with other package managers, we do not consider this question, and we note this as a limitation of our threat model. ↩︎
Gradle can have a verification-metadata.xml file with content hashes, even though gradle.lockfile does not. ↩︎
Note that some flutter subcommands, including flutter run and flutter test, call flutter pub get by default, so these commands can also overwrite the pubspec.lock file unless called with --no-pub. ↩︎
The SwiftPM client has two main ways to download packages: via Git and via the custom Swift Package Registry Service Specification. The latter supports signatures, and the server protocol is implemented by private services such as JFrog Artifactory and AWS CodeArtifact. As far as I can find, there is no repository for the general public that implements this protocol, so I tested the signatureless Git format. ↩︎
Trusted publishing can also refer to using OIDC tokens to authenticate to a package repository, and it does not necessarily involve identity-based signing. ↩︎
Although I did not test PowerShell on Windows, the documented default ExecutionPolicy behavior is to block scripts on Windows client machines, and to require a valid signature for Windows servers. This achieves package integrity. ↩︎
Go calls these downloadable artifacts “modules,” which consist of “packages.” For the sake of consistent terminology with the rest of the post, I use “package” in the general sense, not the Go-specific one. ↩︎
The go.sum file stores hashes, but it is not a lockfile. Instead, it is a local cache for entries from the checksum database. ↩︎
look here y'all. debian made sure all packages were signed and could be traced to an uploader's GPG key what 30 years ago at this point?! (well, apt is only 28 years old but .dsc and .changes files may be older)
The fact that *nearly every package manager since then* has not taken the fucking lesson is depressing.
Here is Anthropic describing (archive link) yesterday how their new version control system, Scion, uses a concept called “derived data” to make operations like blames more efficient:
How Anthropic describes Scion’s derived data.
Here is me, back in 2022, describing in my Oxide candidate materials how the Mononoke source control server I helped build uses a concept called “derived data” to make operations like blames more efficient:
How I described Mononoke’s derived data.
I think the level of imitation goes well beyond having similar insights1. The fact that Sapling was only credited for “hard-won lessons”, and that Mononoke was not mentioned at all, borders on plagiarism. The post comes off as Anthropic claiming that Claude designed all this, while the reality is that our (extraordinary) team at Meta came up with many of the insights that Claude dutifully applied almost a decade later. (We looked at plenty of prior art for Mononoke and Sapling too, from Google’s SrcFS to write-ahead logs in databases.)
I am very glad that the vision our team had back in 2017-18 was so powerful and enduring — when you go against the grain, you’re always a bit unsure if what you’re doing is genius or madness, and I think Mononoke’s design has stood the test of time. And, to be clear, I do not have a problem with Anthropic copying Mononoke’s design. (This is part of why we put out open source — to benefit humanity through the spread of good ideas.)
But as LLMs continue to assist in designing new systems, they are likely to index heavily on existing designs. Mononoke is open source and in every LLM’s training set. If you ask Opus 5.5 or GPT-6 Astra (thanks Matthew Fowle) about prior art, they both immediately point out the similarities to Mononoke.
Giving credit to those that came before us is now easier — and more important — than ever. There is no longer an excuse.
Sony announced that all games from 2028 and onwards
would be digital-only. It seems likely that Xbox will follow and that Nintendo will continue
making “physical” releases for first-party games during
the Switch 2 generation.
In the all-digital gaming future, every game platform
will be subject to the same problems and constraints as media streaming services
like Netflix and Spotify.
We can see hints of how this will affect future games and creative freedom in the medium
by looking at re-releases of older games, in particular: Sonic the Hedgehog 3 and Pikmin 2.
The core problem is that digital games are licenses, which forces
an ongoing relationship between you and the owner of the media.
And because there’s an ongoing relationship with you, any
ongoing licensing relationships that the media owner has
also affect you and your games. If a license for any media that
is part of the game expires or is affected, then the developer
must take action to remediate the “issue” in the game.
This is already commonplace for games that feature music,
such as Rock Band or Guitar Hero, but maybe players find this
more “expected” because these games are essentially
a music streaming service in themselves.
But what about games that aren’t like this on the surface?
Sonic the Hedgehog 3 for Genesis (1994), GameCube (2002), and Switch (2022)
Sonic the Hedgehog 3 was originally published in 1994, and
beyond the game being great to play, the soundtrack is
really something special. I have fond memories of dancing
to the end credits music on my parents’ bed with my brother as a kid after beating the game.
Unfortunately, this track and many others in the game
would not survive our all-digital future. Michael Jackson’s
alleged uncredited involvement with Sonic 3
has meant that all re-releases of Sonic 3 since 2009
have not included the entire original soundtrack. If this
game were released only digitally today, it can be assumed that
these tracks would be pulled from the game, just as
is done for Rock Band and Guitar Hero when licensing terms
expire or there are legal issues.
Pikmin 2 for GameCube (JP, NA, PAL, 2004) and Switch (2023)
Pikmin 2 was published in 2004,
and the main objective is collecting “treasure” from an alien planet in the form
of food, toys, and, most surprisingly, items featuring real-life brands
like Duracell, Dr. Pepper, Yoo-Hoo, and Snapple. This artistic
decision and the work to license and include these brands were a substantial part of the surprise and delight
while playing the game.
However, you can see that these licensing terms
eventually run out, too: in all re-releases of Pikmin 2 from 2023 onwards,
the real-life brands are replaced with generic fictional brands.
It’s not clear to me whether licensing agreements with
so many brands would be undertaken in the future if work would
have to be done to create fictional models and textures anyway
once the license terms expire.
If it wasn’t clear from this post, I’m not excited for an all-digital
future of games. An all-digital future for games means the medium will be further constrained
creatively, in addition to the negative impacts on ownership and preservation.
Read-only physical media does more for gaming
than being something to collect and own: developers can make
choices that they won’t have to walk back in 20 years,
and players can continue to enjoy games as the developers
intended long after licensing terms expire.
"This artistic decision and the work to license and include these brands were a substantial part of the surprise and delight while playing the game." um ok
The Maintainers Summit is a one-day, invitation-only gathering of about 30
kernel developers; it is held once each year to discuss policy-related issues
that are not always amenable to resolution via email. The 2026 event was
scheduled for October 8 in Prague, Czechia. Unsurprisingly, the discussion
there was dominated by large language models (LLMs) and their effect on the
development community, but some time was also found to talk about security
bugs and long-term succession planning.
Unlike previous years, the 2026 Summit did not have a well-defined schedule
with specific developers identified to lead the discussion on each topic.
The conversation was rather more free-flowing, and this writeup will match
that structure (or lack thereof). Some minimal reordering has been done in an
attempt to provide a more coherent overview.
TL;DR
For those who do not want to plow through all that follows, here is a
summary of the most significant conclusions. Please note that this is
entirely my interpretation; it is not any sort of official communication from
the Summit.
Sashiko no longer reports pre-existing bugs found when reviewing patches; the
reaction to this change was mixed. Sashiko is appreciated, but some
maintainers fear it fuels the rapid tweak-and-resend cycle that new
submitters tend to fall into.
Linus Torvalds believes that blaming LLMs for the kernel community's
problems is wrong, when the problem is LLM users who do not understand
how to use them or how the kernel works. A properly trained LLM is a
useful tool, but it takes a lot of time to reach that point.
Torvalds and others repeatedly said low-quality contributions from new
developers should receive low priority, and that the community should
stop trying to make contribution easy. Many developers said,
repeatedly, that trying to mentor those developers is almost always a
waste of time; they do not listen.
There is some concern about companies maintaining private kernels with
LLM help, but there does not seem to be much to be done about it.
Kernel developers should not be required to use LLMs to work in the
community, but those who do need to have enough resources available
to generate acceptable results.
The requirement to add Assisted-by tags to patches created with LLMs
will be removed, but maintainers still want to know about how a patch
was created.
The development community is struggling to keep up with the flood of
security patches, and will continue to for some time. Some of the
most urgent fixes may bypass maintainers and go straight to Torvalds.
Maintainers were cautioned against telling their employers about
vulnerabilities before public disclosure happens.
The maintainers each briefly presented an aspect of the development
process that causes them pain; many talked about the review process,
keeping up with the load, and submitters who are not interested in
learning.
Torvalds said that the community should start thinking more about how
leadership succession should work so that there will be a plan in
place when, some years from now, he decides to retire.
Sashiko and patch review
The initial topic was automated patch review, and the Sashiko review system in particular. When
Sashiko is looking at a specific patch, it often identifies (and reports
on) problems that already exist in the code that is modified by that patch.
Developers have a love-and-hate relationship with the resulting reports; it
is good to know about the bugs, but nobody is thrilled to be given a
laundry list of problems in need of fixing, especially if it is seen as an
obstacle that must be overcome before they can merge the changes they
actually intended to implement.
Recently, Sashiko developer Roman Gushchin announced that
pre-existing bugs would no longer be included in patch reviews; instead,
they will be stored into a separate database and made available to
maintainers. Ted Ts'o started the Summit discussion by mentioning this change,
noting that there is a large backlog of problems that no longer appear in
Sashiko reviews. Peter Zijlstra asked why this change was made, since it
is still important to know about those bugs; Gushchin answered that the
bugs are still being detected, but they are hidden from the reports and set
aside waiting for somebody to deal with them.
Christoph Hellwig said that it would be better to keep the pre-existing
problems in the patch review, but perhaps mark them differently so that
submitters know they are not required to address them. Old problems should
not be forced onto new submitters, he said. Mark Brown agreed, saying that
submitters should not have to fix a structural problem in order to get a
spelling fix in. Hellwig added that removing the pre-existing items is
worse, since they are problems that need to be fixed eventually.
Gushchin repeated that those problems are collected for people who are
interested in fixing them.
Zijlstra complained about maintainers who refuse to consider patches until
Sashiko reports that it has found no problems. Hellwig, though, said that
Sashiko reviews are a good test for submitters; if they know what they are
doing, they should be able to explain why a warning is wrong. Thomas
Gleixner replied that the worst submitters will just feed the review
into their LLM and send the response.
Ts'o suggested that the best practice will differ from one subsystem to the
next. In larger subsystems, the sub-maintainers may not have the skills to
tell whether a given bug report is valid or not; they are having a harder
time dealing with false positives. A small subsystem with expert
maintainers handles those reports better. The solution is partly cultural,
he said; it is necessary to tell people that they can ignore the
pre-existing problems. Dave Airlie suggested splitting the report into two
emails, one with the review of the patch and a second listing the
pre-existing problems.
Hellwig shifted the topic slightly by complaining that Sashiko drops most
of the recipients from its replies; they should go to everybody, he said,
or the thread of the discussion will be broken. David Hildenbrand was
quick to disagree, though; in the memory-management subsystem, the Sashiko
emails are seen as useful for maintainers, but should not be automatically
sent back to the submitter or the mailing list. In a complaint that was
heard a few times during the day, he said that submitters spend time
submitting multiple versions of a patch set that address comments from
Sashiko before human reviewers have a chance to say whether the patch makes
sense at all. The Sashiko reviews tend to discourage human reviews in
general. His suggestion was that Sashiko should be the last line of
defense rather than the first; maintainers should say when the automated
review happens.
Review practices
That led to a discussion on review practices and when human reviewers
should get involved with a submission. Ts'o said that, in the ext4
filesystem, it depends on the size of the series and the reputation of the
submitter. A single patch from an unknown contributor is likely to be
LLM-generated crap, so it ends up low on the prioritized list of work to
review. A larger series, though, requires architectural review, so he
tends to look mainly at the cover letter and limit comments to the overall
design.
Jiri Kosina said that deprioritizing unknown contributors is too easy of a
solution; in his experience, the patches they submit are often valid.
Brown said that proximity to the hardware makes a difference, and that
one-off patches to low-level code often have little value. Paolo Abeni
said that, in the networking subsystem, there is a complicated scheme for
prioritizing reviews that depends on the contributor's reputation, how many
reviews that contributor has done, and the reputation of the contributor's
employer as well. Airlie warned that tracking reputations raises privacy
problems and invites developers to game the system; he understands why that
approach has appeal, but a better way is needed. Konstantin Ryabitsev
agreed that any reputation system will be gamed.
Laurent Pinchart said that some developers are frustrated that they have to
justify their work against criticisms from Sashiko while other,
LLM-generated patches appear to be accepted immediately. Abeni defended
the automated reviews, though, saying that the number of patches
introducing bugs has dropped considerably. Zijlstra said that, while
reading LLM-generated reviews "shuts my brain down", he still
thought that the tool is useful; it finds real problems.
Linus speaks
At this point Torvalds, who had kept silent until now, spoke up.
The problem, he said, is that we are getting increasing numbers of patches
from people who do not know the kernel. By pointing the finger at LLMs,
maintainers are blaming the wrong thing. LLMs can do a good job, but they
are being driven by people who have no clue, and the results are ugly. He
suggested maybe delaying reports from Sashiko for 24 hours; that will
keep clueless developers from getting an immediate response and cranking
out new versions of their work.
He has been playing with an LLM on a separate project for several months to
learn about the technology, but hadn't used one on the kernel until last
week. He took an old patch and had the LLM revise it; the result has made
him unwilling to work without an LLM. He plans to post that series
at some point. Why bother, he asked, to search for all
of the call sites of a function he has just modified, when the tool can fix
them all automatically? But, he said, it took six months to set up the
tool to not produce bad responses. If you are a competent developer, he
said, an LLM makes a great tool, but only after that effort has been put in
to set it up. He resisted suggestions to post his LLM-training materials,
saying that each developer needs to go through that process separately.
In conclusion, he said, arguments about how to deal with people using LLMs
are misdirected; instead, developers should be focused on how to use these
tools well. Hildenbrand said that Torvalds is an expert, but that we still
have to deal with all of the non-experts who are submitting patches;
Torvalds said to simply deprioritize them.
Sasha Levin suggested putting more information into the repository to try
to direct the tools; he later posted a first
installment toward building up that information. Ts'o said that it
would be useful to try to provide better input for the developers who are
willing to put in the effort. Alexei Starovoitov, though, answered that it
is not the maintainers' job to teach humans how to work on the kernel. The
community is teaching bots by way of the mailing lists, though, and
that is reinforcing the problems with rapid reposting of patches.
Gushchin said that, eventually, Sashiko may be able to tell a contributor
that a patch is a bad idea in general and should not be revised. Greg
Kroah-Hartman said that we can expect to be on the receiving end of a
firehose for the next 18 months, then we will have fixed most of the bugs and
life will get better. Pinchart responded that fixing the bugs is not
enough; the kernel is full of bad APIs that are easier to misuse than to
use correctly. Kroah-Hartman said that the bugs will eventually be fixed,
then there will be space to work on the APIs.
Ryabitsev said that problem is that contributing to the kernel has always
been gated; it is too hard for many developers to do successfully. LLMs
have made the creation of kernel patches easy. Pinchart said that a lot of
LLM-using contributors just want to see their name in the changelog; they
are not going to stay around, so any effort put into mentoring them is
wasted. Torvalds repeated that maintainers should simply deprioritize
those contributions. Hildenbrand asked how that could be done; Zijlstra
suggested responding to a patch and seeing whether LLM-generated text comes
back. Comments that do not evoke a clear human response can simply be
ignored. Kroah-Hartman said that is the value of pointing out trivial
items, like include files in the wrong order. Christian Brauner said that
overly verbose changelogs are often a sign of LLM use.
Airlie suggested adding guidance for LLMs that prohibits them from writing
changelogs. Levin has been trying to add some of that type of guidance for
a while; that effort is likely to be pursued further. There was general
agreement that, even if the code is written by an LLM, the accompanying
changelog should be written by the human behind the work.
Private kernels
Brauner said that the work of the kernel community is changing in
fundamental ways, and what it means for Linux is unclear. There is
increasing interest at companies in maintaining private forks of the kernel
and not bothering with upstream. Zijlstra suggested asking Google how well
that works; Gleixner added that the fundamental economics around
maintaining a kernel have not changed. Brauner said that the developers in
the room had grown up in an environment dominated by open-source software,
and that working with it could lead to a good career; if that is no longer
the case, why should anybody bother contributing back?
A number of participants suggested that any company wanting to try its luck
with a private fork was welcome to do so. Kroah-Hartman said that the
community's goal has always been to make it cheaper to work upstream than
to maintain private code.
Miguel Ojeda asked whether that was still possible; he knows somebody who
has used an LLM to summon forth a complete kernel written in Rust. How can working
upstream be cheaper than that? Torvalds said that, if it gets to that
point, the community may no longer be viable, but that is not the situation
now. Starovoitov said he knew of five working kernels that had been
generated in this way; Torvalds answered that there is no point in worrying
about them.
Tso's said that, if somebody wants to conjure up a fast microkernel for a
specific use case, they can do that now, but a general-purpose kernel
designed to handle random corner cases is a different story. He thinks
that there will be a demand for the Linux kernel for some time yet.
Starovoitov stressed the need to understand why there is interest in
generating private kernels; Linux, he said, is too full of holes that are
not being fixed quickly enough, and contributing to the kernel is too hard.
Too hard, or too easy?
This was my chance to share a couple of anecdotes I had been saving for
this gathering. While running on the unending treadmill that is keeping up
with the linux-kernel mailing list, I had recently encountered a series of
well over 100 patches, all sent within an hour from a new identity, making
significant changes all over the kernel tree. When viewed that way, those
patches are the obvious output of an unleashed bot and best ignored, but
most maintainers only see a few of them, miss the pattern, and attempt to
engage seriously with the sender. So many of those patches are applied.
There is an incredible flood of first-time contributors (nearly 800 in 7.3
alone) burying the community in patches. There have been plenty of cases
of first-time contributors who make non-trivial changes to multiple
subsystems over a short period of time. To me, it is clear that many of
these submitters do not understand what they are doing, and they will not be
around to fix or maintain those patches. But a lot of that code is getting
into the kernel. My fear is that we are building up a collection of code
that nobody understands, and that one day we will wake up and find that we
have completely lost control of our kernel.
Airlie responded that we never really did have control over it. Torvalds
said that the time has come to make it harder for new people to contribute
code to the kernel. People like Kroah-Hartman have spent years trying
to teach people how to contribute; it is time to stop doing that, he said.
Ojeda said that there is a need to deprioritize these contributors, but
that we still need to find talented people to join our community. That
means finding ways to focus on the people who actually matter. For
example, the people who take the time to go to conferences are much more
likely to stay around. The vast majority of patches from new contributors
are not worth it, but some are, and identifying them is hard.
Shuah Khan said that she can identify the people who will stick around
fairly quickly, and some of the new folks who have come in are excellent.
For this reason, she still spends a lot of time with people sending
spelling fixes. Hellwig said that developers should be able to use
whatever tools they want. For any non-trivial work, there will always be
problems to fix; at that point, it is a matter of whether it is possible to
have a real conversation with the contributor. Abeni, though, objected
that this approach does not scale for the larger subsystems.
Generating code
Ojeda raised the topic of where generating code with LLMs makes sense. In
the presence of a clear specification and a concrete problem, an LLM can
create good results, he said. The tools can be good for trying out
concepts; it may not even be necessary to look at the resulting code before
tossing it and implementing a successful concept properly.
Generating tests is another place where LLMs can do well. Brauner said
that LLMs can be good for prototyping.
Hildenbrand said that the discussion had focused on new contributors, which
is fine, but how can we let other maintainers know that it is acceptable to ignore
patches from those people? Hellwig said that it is always acceptable to
ignore patches; I replied that, for many years, we had been working hard to
prevent patches from falling through the cracks.
Torvalds suggested adding an AGENTS.md file that makes generating
kernel code expensive. He ends every session with a lengthy cleanup pass
that takes a couple of hours to run, executing tasks like ensuring that the
code matches the comments. That amount of work cannot be done with a free
LLM account. I asked whether that risked cutting off bright new developers
that we would rather hang onto; Torvalds answered that the kernel project only
wants serious developers. That includes having access to enough resources
to function in this world.
Pinchart said that he has heard from a number of developers who are afraid
that they will be forced out of the community; Torvalds replied that it
will always possible to write code and send email. The point is filtering
out the people who cannot do that on their own. Pinchart asked Torvalds to
confirm that he is not trying to push out developers who do not use LLMs;
Torvalds agreed that he is not. Pinchart added that it is important to
communicate that message to the community. Torvalds added that he does not
want to scare off people who want to write code; his message is that you
have to either put in the effort to learn, or put a lot of money into an
LLM to participate.
Airlie expressed a concern that there might not be anything left for those
people to write; as soon as an idea is raised, somebody can summon an
implementation from an LLM. Alice Ryhl agreed that this could be a
problem. Ojeda suggested setting up a way to assign a project to a
developer for a period; Hellwig said that the only reason to do that would
be for training purposes. Otherwise, why wait when there is an
implementation ready? Ojeda said that supporting developers who do not
want to use LLMs is also a good reason.
Assisted-by
Documentation/process/coding-assistants.rst
was added to the 7.0 kernel to provide guidance for developers using these
tools; among other things, it calls for an Assisted-by tag to be added to
the changelog of patches developed with LLM assistance. The 7.3 kernel has
seen 18,533 non-merge changesets (a record) added through -rc7, 1,884
(essentially 10%) of them contain Assisted-by tags. The actual number of
LLM-assisted patches is surely much higher.
In the Summit, I pointed out that huge numbers of contributors are not
placing those tags despite using LLMs; sometimes that is the result of
ignorance of the rules, while other times contributors want to actively
hide their LLM use. But few maintainers are asking contributors about LLM
use and ensuring that those tags are present. As a result, Assisted-by
provides no useful signal. We should either find a way to enforce the
requirement, I suggested, or else just drop it entirely.
Airlie said that probably 90% of contributors are using LLMs now. Many of
them, he said, fear being caught up in an anti-LLM witch hunt. He suggested
adding a requirement that models read all of the kernel's documentation
into an AGENTS.md file. Torvalds thought many submitters were simply
ashamed to admit that they were using those tools. Gleixner suggested, not
entirely seriously, adding a Not-assisted-by tag instead; Arnd Bergmann
said he would find that a useful indicator of developers he should put time
into helping.
Torvalds said that the tag requirement might scare people away from using
LLMs, and that he would be happy to drop the requirement; Brauner added
that it is pointless now. Khan said that she still found Assisted-by to be
useful, but there was a strong consensus in the room that the tag had
outlived any purpose it may have had, and that the requirement could be
dropped.
That said, there was also a general interest in knowing how patches are
created. Some would like to see which models were used, or where in the
development process they were brought in. Maintainers still want to know
if there is a human involved in the development process. There was
agreement, though, that this information does not need to be recorded in
the changelog; the suggestion came out of the discussion is that this
information should be put into the cover letter instead.
Security issues and urgent fixes
The advent of LLMs has resulted in the discovery of huge numbers of
security-relevant bugs, leading to a lot of fixes. Kroah-Hartman, who
plays a central role in responding to those bugs, said that there are many
more coming. Current tools find a lot of vulnerabilities, he said, but
they are also wrong half the time; he has students working on improving
that performance. He also has people and funding to help with handling the
resulting fixes. We can work through this pile of problems, he said, but
it will take a while. That is what the next year of work will be focused
on.
Levin added that LLMs do two things that are new. One is that they are
good at developing an exploit from a patch; the other is that they can be
used to monitor mailing lists and figure out which fixes have security
implications. The result is machines that are automatically cranking out
exploits. As soon as a problem has been detected, he said, any embargo is
already over. There are thousands of known exploits out there at the
moment.
Kroah-Hartman said that the only thing that can be done is to get the fixes
into the mainline as quickly as possible. Brauner pointed out that this
leads to large pull requests after -rc1, which Torvalds has complained
about. Torvalds, though, said that pull requests full of fixes are fine as
long as they come from people who he can trust to have verified them to be
fixes for real problems. The cost to him of doing a pull is almost zero;
it's his job.
Pinchart said that, while fixing bugs is good, what is really needed is
ways to prevent the addition of new bugs. Kroah-Hartman said that
increased use of Rust would help in that regard; many bugs are in error
paths, and Rust has better ways of handling those. There is also an effort
to scale up the work on hardening C code.
Some of that work is landing in the newest versions of the compilers, but
developers often do not have easy access to them, and linux-next does not
either. Ojeda said there is work underway to increase the availability of prebuilt
toolchains that developers can use to test their code.
Kroah-Hartman said that security bugs are being immediately copied to
maintainers now rather than being kept secret; it is the only way to keep
up with the flood. But, he cautioned, maintainers should not be telling
their employers about those bugs before they are public; otherwise the
project as a whole risks running into trouble with government agencies
worldwide. Once a fix has been pushed, though, the embargo ends.
Starovoitov said that there are lists of vulnerabilities that have been
discovered by LLMs, many of which have reproducers available. He wondered
what the best way was to get those fixes into the mainline. Torvalds said
that, when there are real kernel developers involved, the most urgent
patches can go directly to him, bypassing maintainers and avoiding adding
to their workload. Hildenbrand worried that maintainers would lose the
opportunity to review fixes in their subsystems, and that they would lose
control, but Torvalds answered that reviewing all those fixes just adds
stress for everybody involved.
Pain points
Prior to the Summit, Torvalds asked each of the participants to prepare a
one-minute summary of their biggest pain point for the group. These
presentations would happen over a half hour, with no discussion until
everybody had said their piece. The "no discussion" rule held most (but
not all) of the time. In the order they were presented:
Kroah-Hartman: subsystems that do not add CC:
stable@vger.kernel.org tags to patches, but which still expect
the stable team to pick up the important fixes anyway. The stable
maintainers are overwhelmed as it is and are not doing that.
Pinchart has heard from developers that they submit code,
but do not know when their patches have been applied or to which tree.
More maintainers should send emails when they apply patches, he said.
Eric Biggers: patches that cannot easily be applied, and which
do not specify a base to which they can be applied. A lot of patches
cannot be properly reviewed without applying them first, he said.
Rafael Wysocki: insufficient feedback on patches in general.
People often have opinions, but do not always share them.
Airlie asked his sub-maintainers; most of them identified
him as the biggest pain point. More seriously, it was that the DRM
subsystem is still seeing too many regressions. There is a push
within the subsystem to move development to GitLab in order to use its
CI features; he is not standing in the way because he wants to see how
it turns out.
Ts'o: prioritization, and having too many things to look at.
He would love to add a priority tag to patchwork that maintainers
could set to help identify what needs attention first.
Ryhl: not knowing how long she needs to wait after sending
a version of a patch before concluding that she does not need to worry
about problems with it.
Me: huge number of patches touch the documentation directory,
and it is hard to know which ones I should apply and which to leave to
others. A lot of time is spent digging through linux-next to see if
patches have been picked up by somebody else. Torvalds said that he
often has the same problem.
Khan complained about the same problem; it is often not clear
who will pick up test patches.
Hildenbrand: the high review load. Review cannot just be
handed off to a bot; most changes need input from developers.
Somehow, the subsystem needs to develop more experts, but it is hard
to identify people who can grow in that way.
Bergmann said that the review process is breaking down.
When he replies to patches, he tries to teach contributors how to do
better, but he has become discouraged because people using LLMs do not
learn. So now those who might learn are not getting the feedback
they need. The opposite problem happens too: a submitter sends 50
versions (literally) of a patch and responds to comments, but Bergmann
thinks that the patch should not exist in the first place.
Starovoitov: maintainers should not be looking for bugs or
coding-style problems; bots will do that now. Instead, reviews should
be strictly focused on the "why" of a patch, whether the fix is made
in the right place, and is in good taste.
Ryabitsev: the last entry in the MAINTAINERS file,
titled "THE REST", directs every patch to the linux-kernel
mailing list. That generates millions of outgoing emails every day,
leading to constant delivery problems. He asked whether that entry
could be removed or changed to redirect patches to the
patches@vger.kernel.org list. He later submitted
a patch to get_maintainer.pl, causing it to only add
linux-kernel if no other list has been identified as a
recipient for a patch.
Levin: subsystems are diverging in their practices, and many
now have a manual on how to interact with them. That makes life hard
for developers working across subsystems; he would like to see the
community come back together.
Hellwig: the Sashiko review workflow is broken, causing
people to continually resend patches. There is no obvious answer to
this problem, but something needs to improve.
Brown asked subsystems with tests to actually build and run
them so they don't break in linux-next.
Kosina: there needs to be a better way to prioritize the
handling of submissions. He liked Ts'o's idea, but without using
patchwork.
Will Deacon: the process is not much fun anymore;
maintainers try to explain to contributors how they could improve, but
are ignored.
Danilo Krummrich does not mind seeing multiple versions of
a series in a short time, but submitters are just feeding the Sashiko
reviews into their LLM to create those new versions. A way needs to
be found to encourage submitters to engage and talk to maintainers.
Abeni: the infrastructure is not keeping up with what the
subsystem needs. Networking runs its own version of Sashiko, which
produces better results, but it can't be run for every networking
subsystem. That creates extra friction for maintainers.
Eric Dumazet announced that he had just retired, and that
all of his pain points have vanished.
Gushchin: Sashiko has gone from an experiment to a widely
used tool in the community. There is a lot of work involved beyond
developing the bot itself; he has to obtain tokens to run it, explain
its value to management, and more. He could really use more people
and more feedback. He only knows a few kernel subsystems; if people
don't tell him about problems with the others, he will never know.
Julia Lawall does not know if her work, much of which has
involved finding and fixing bugs in the kernel, will have any relevance
in the future. Five years ago she would have asked for more feedback
from developers, now she isn't sure if it matters.
Ojeda: tree-wide refactoring work can be tricky, and the
advent of more Rust code seems set to make it harder.
Gleixner has spent much of his time looking at design patterns
and explaining them in lengthy emails. Developers used to appreciate
that work, but more recently it is mostly ignored, and he wonders if
it is still worth doing. In the LLM world, people say that they don't
have time for design and, besides, the code works. He has spent
25 years doing cleanups, and does not want to merge more stuff
that will just have to be cleaned up in the future.
Brauner: code removal. The time has come to fix less code
and to remove more of it.
The idea was that these pain points would be discussed after the
presentation, but that did not really happen. Instead, the conversation
took a rather different direction.
Succession
Torvalds let it be known that he was about to go on vacation for two weeks,
which is a bit awkward given that there is a merge window coming. So he
was considering extending the merge window for a third week in response.
There was not a lot of opposition to that idea in the room.
He went on to talk about succession plans. The 2025 Summit included a discussion on that topic that was focused
mostly on what should happen if Torvalds abruptly became unable to continue
leading the project. This year, he said that, while he is not going
anywhere anytime soon, it is not too early to think about how a graceful
transition to a Torvalds-less future might happen. To help that process
along, he has started actively ignoring more emails and stepping back a bit
from development questions. He is curious to see how the community will
react.
There followed a wide-ranging but inconclusive discussion about the role
Torvalds plays in the community and how things might operate when he
finally decides to move on to something else. The two chief aspects of
that role of can be described as "patch monkey" (executing pull requests)
and resolution of conflicts between developers — which he professed to be
bad at. In the future those roles could perhaps be split apart. The
project could name a new benevolent dictator, or perhaps move to some sort
of committee model.
No decisions were made — none are needed now, and none were expected. But
Torvalds clearly feels that it would be better to think about these things
well ahead of time rather than under pressure. There will be a mailing
list created, initially with the Summit attendees as members, where the
discussion can simmer. At the end, Gushchin pointed out that the world
looks quite different now than it did one year ago; with the current rate
of change, it is going to be hard to make meaningful plans for an event
that is expected multiple years in the future.
Metadiscussion
The closing topic was about the Maintainers Summit itself, and how it might
be improved in the future. It started with a reference to this
August thread where James Bottomley questioned whether the event should continue
to exist at all. Few people seem to think it should be abolished, but
there were concerns expressed about the process for selecting attendees,
with some people describing it as a closed clique.
Perhaps unsurprisingly, the maintainers in the room, all of whom had
received invitations, did not see a lot of problems with that process.
High-level process discussions tend to need the high-level maintainers in
the room. As Brauner pointed out, that group is always going to seem a bit
elitist. But, he said, getting that group into the same room once each
year is helpful for the management of the project as a whole.
Torvalds said that the older format of the Kernel Summit, which topped out
at about 150 participants, was simply not manageable. The smaller group is
at least able to have constructive discussions, he said. Hildenbrand said
that one problem is a widely held impression that proposing a topic for the
Summit will necessarily result in an invitation; he suggested that the call
for topics next year should be rephrased.
Ts'o said that colocating the Summit with the Linux Plumbers Conference
(LPC) works well, and that holding the Summit afterward works best. That
allows the participants to gather information from others and bring it into
the more focused group.
Hellwig put in a request for a different sort of gathering where developers
from one subsystem can hold "office hours" to talk with others. That sort
of happens at conferences now but, he said, the time at those events is too
structured and there are too many other distractions happening. Bergmann
pointed out that the LPC kernel-summit track has become less relevant over
the years, and suggested that some of that track's time could be
repurposed; that idea was reasonably well received. There was also talk of
using a videoconference server to host subsystem-specific office hours at
other times.
The meeting closed with a general agreement that its format works fairly
well, and that the office-hours idea might improve it. The biggest change
might be in the call for topics, which may be rewritten to provide more
information about how the selection process works and to make it clear that
people can nominate others to attend. There was, finally, a suggestion
that the ksummit mailing
list could be used more. There are usually interesting discussions
there in the lead-up to the event, but then it goes quiet the rest of the
year; there is no reason why discussions of that type can't happen there at
other times as well.
> [Linus said] it took six months to set up the tool to not produce bad responses. If you are a competent developer, he said, an LLM makes a great tool, but only after that effort has been put in to set it up. He resisted suggestions to post his LLM-training materials, saying that each developer needs to go through that process separately.
I'm in the process of fleeing digitalocean in the face of their
funding of organizations run by abhorrent people.
This may prove disruptive for my blog and other resources that were historically hosted there (for 12 years!).
Note: If you can see this, you're using the new server!
 Log in


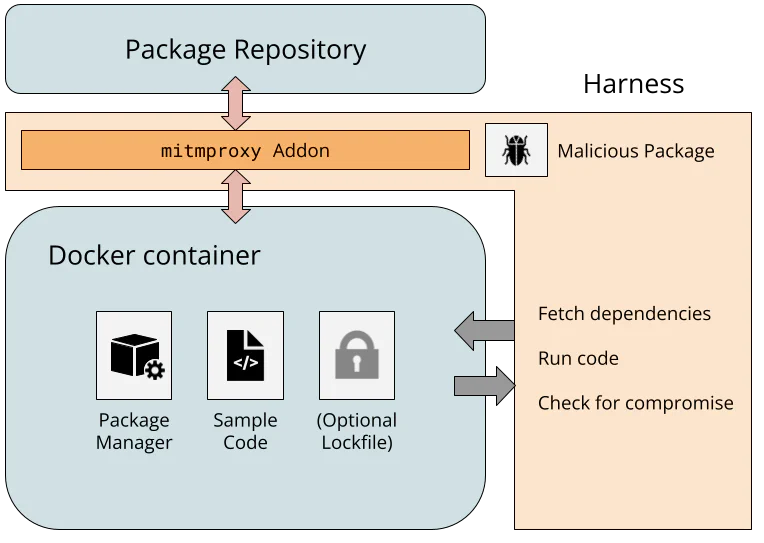
 reply
reply

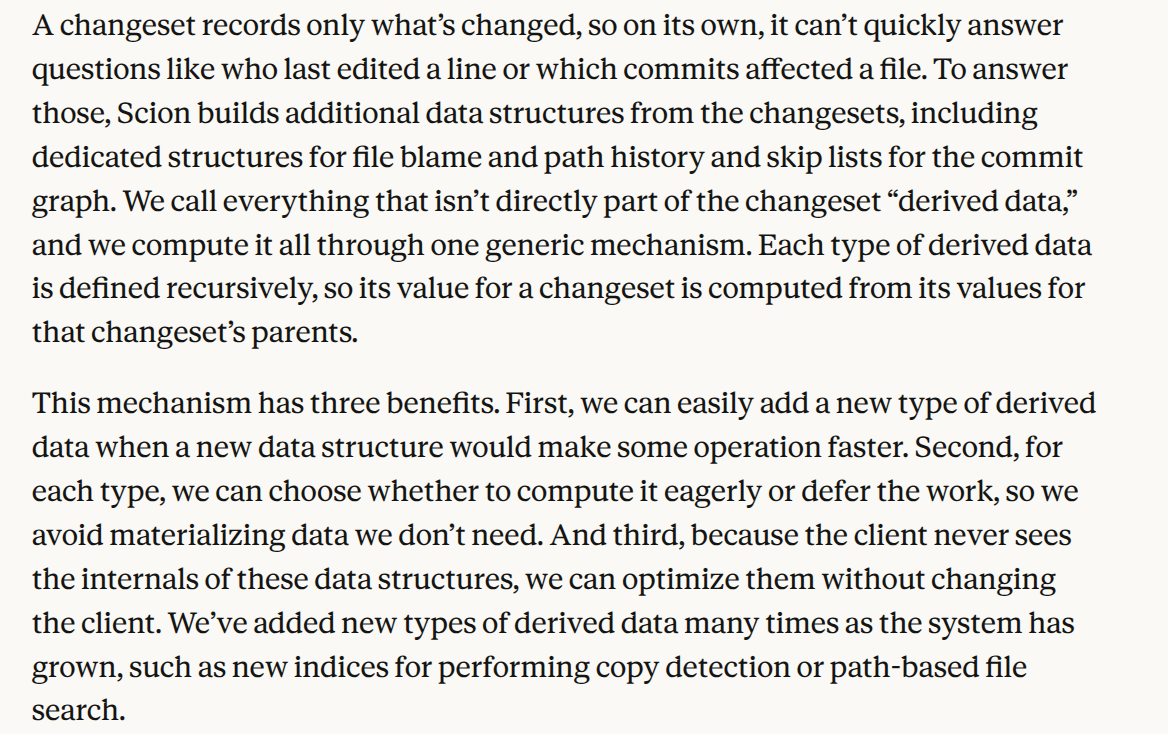
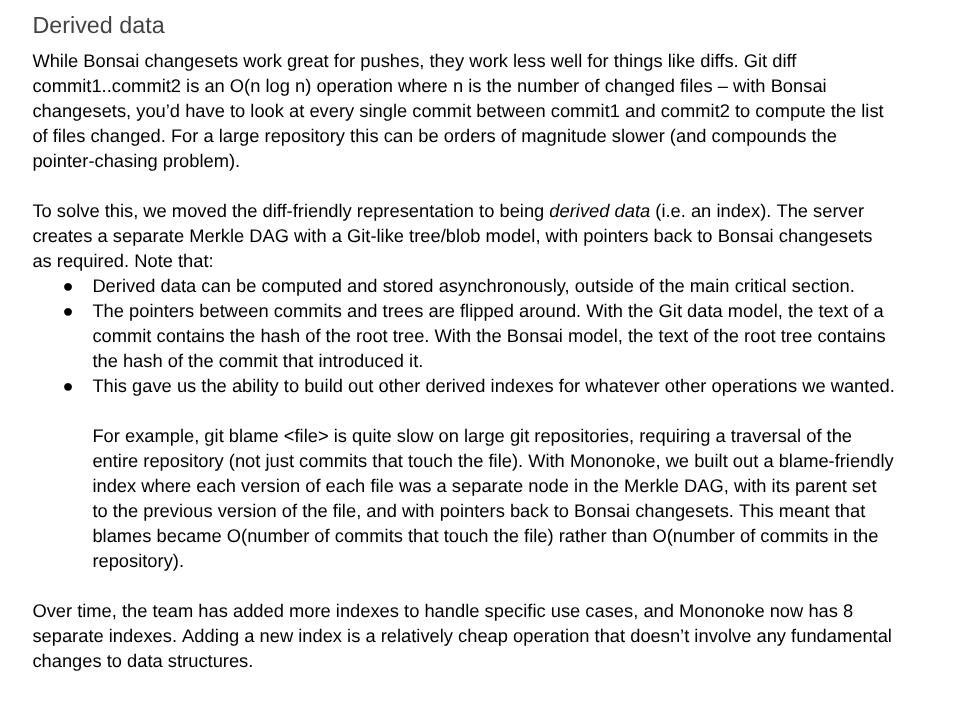

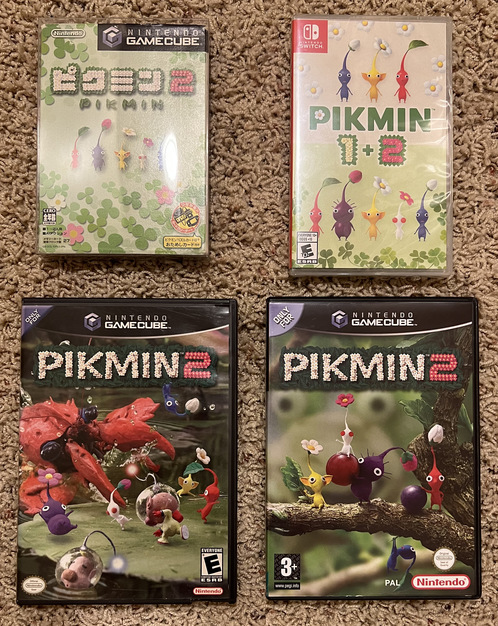

![[Group photo]](https://lwn.net/images/conf/2026/lpc/ms-group-sm.png)
